An Excavator Jack Hammer of Over 5 Years Life at a Reasonable Price – Sjheavy
The Lowest Maintenance Cost
The top 1 to consider when choosing an excavator jack hammer is to keep low maintenance costs in the long service life. The excavator jack hammer we offer has a qualified service life of 3-5 years. To avoid your headache in the after service, a Free maintenance bag goes with each hammer. The bag covers regular wearing parts like rod pins, stop pins, and seals that could fulfill your one-year use. Contact us for a Free maintenance bag.
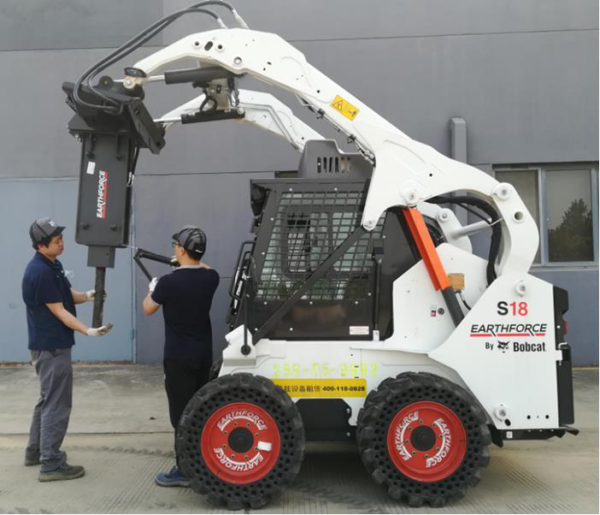
The Best Design for a Skid Steer
The skid steer jack hammer has so many designs due to various applications. For instance, the mounting cap design varies according to usage. Also, some excavator jack hammers can be used to carry a concrete plate. Then the hose adapter must be installed downside. Need a skid steer jack hammer perfectly handling your request? Ask for a tip.
A Qualified Jack Hammer for Your Backhoe
A backhoe has unique requests when choosing an excavator jack hammer. There are a number of designs in the market and some are really bad. It can lead to bracket cracking and damage your hammer. Normally, a triangle bracket can provide good operating vision and durable performance. Contact us to buy a qualified jack hammer for your backhoe.
Features Distinguished from Competitors
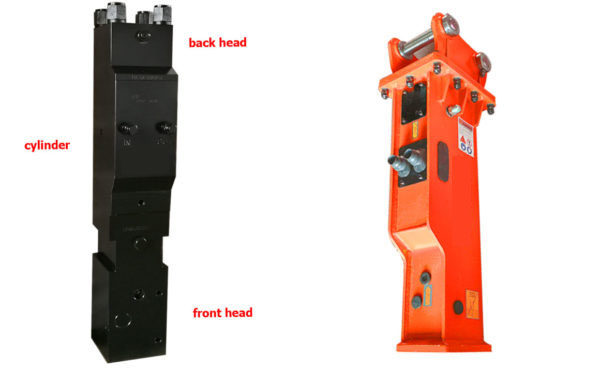
Solid-body: SCM440 alloy steel cylinder body, same as Atlas Copco.
Simple Structure: Inward valve and non-accumulator design, easy for maintenance.
Only 2 Moving Parts: Low failure rate and high stability.
Durable Through Bolt: Selected material and the special process of low fracture rate.
Hybrid Power: Hydraulic and nitrogen hybrid power, stronger striking force.
Removable bracket bush: Easy to mount on different excavator models.
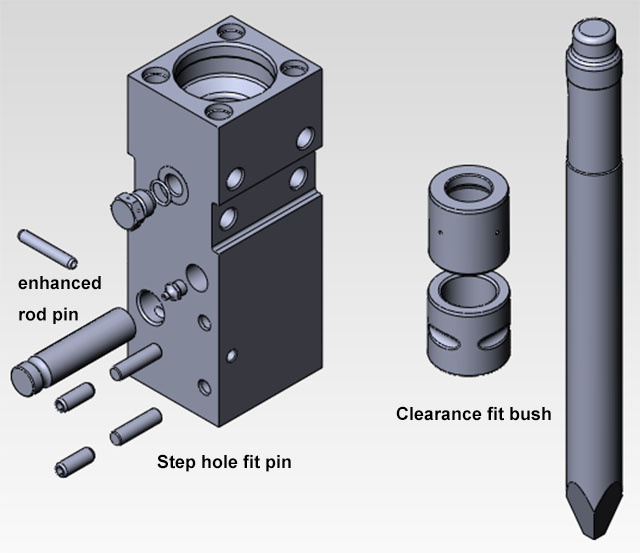
Clearance Fit Inner Bush: Easy to install and replace, low cratching rate.
Step-Hole Fit Stop Pin: No more spring pins needed for fixing, less maintenance cost.
Enhanced Rod Pin: Less cracking rate and longer service life.
FAQs
Q: How simple is the structure?
A: Simplicity brings better stability. Unlike many excavator jack hammers, Sjheavy removes the accumulator and adopts an inward control valve. It means fewer socket bolts are installed which reduces body weight and maintenance cost.
Q: What are the 2 moving parts?
A: The piston and control valve are the only 2 moving parts when hitting. This means less energy loss and better stability.
Q: What does “clearance fit” mean for a bush?
A: It means quite a lot. A clearance fit bush is easy to install and replace as long as the processing precision is guaranteed. While some jack hammers adopt “interference fit”, the bush has to be under the “heating or cooling” process when assembly. It is unrealistic for most workshops when replaced.
Q: What does “step-hole fit” mean for a stop pin?
A: It means fewer parts are needed. Unlike “through-hole”, it does not need a spring pin for fixing, which reduces maintenance cost and improves stability.
Q: Why is the through-bolt solid enough?
A: One point is the selected material. Besides, it has to follow the standard assembly process based on certain torques to make sure all bolts are even by force.
How to match an excavator jack hammer with the right size excavator?
The right size carrier is required to install an excavator jack hammer. Efficiency can be improved thus safeguarding your money.
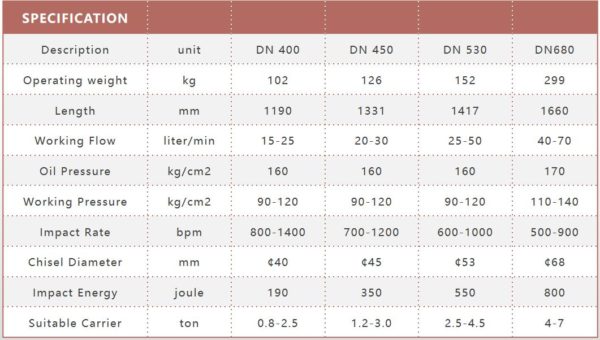
The hammer size can be determined by weight ratio, energy impact, chisel diameter, working flow, etc.
Hydraulic Flow
The working flow and pressure of the hydraulic jack hammer vary with the size. The flow of a small jack hammer can be as small as 23L per minute, while a large jack hammer can reach more than 400L per minute.
When selecting a jack hammer for an excavator, the flow requirement of the hydraulic jack hammer must be consistent with the output flow of the spare valve of the excavator. For example, a 20-ton class hammer works best under oil flow 120-180 l/min. Check the specification in the brochure to confirm it.
Generally speaking, the flow rate determines the working frequency of the hydraulic jack hammer, that is, the number of impacts per minute, and the flow rate is proportional to the number of impacts.
However, when the output flow of the spare valve of the excavator is greater than the demand flow of the excavator jack hammer, the hydraulic system will generate too much heat, resulting in excessive system temperature and reducing the service life of components.
When selecting the hydraulic hammer, the working pressure of the jack hammer must be consistent with the limit pressure of the standby valve. If it does not match, an overflow valve should be added to the pipeline system and adjusted according to the rated pressure of the hydraulic hammer.
Tool Diameter
There is a normal match between the carrier size and chisel diameter. It considers the comprehensive applications along with the excavator size. Like, the 140mm tool diameter jack hammer works well on a 20-ton class excavator. It means the DN1400 jack hammer is one of the best matches for a CAT320 or a KOMATSU PC200. Check the specification in the brochure for details. Tool diameter is by far the most popular standard when choosing the right size jack hammer.
Impact Energy
It is an old standard but still used in many jack hammer brands. Actually, it is an ideal energy class level carried out in the lab. It is only referencing data for users.
Carrier Weight
It is suggested by some people that the weight ratio between an excavator jack hammer and the carrier should be 1:10. That is roughly true. It is in perfect condition that a jack hammer could bear the lightest weight with the most robust power, but that only happens theoretically. A balance of the weight ratio is usually 1/10 of the excavator. For instance, a 20-ton excavator can mount with a hammer weighing 2 tons. It is truly an overweight jack hammer will put more burden on the arm and even leads to roll over, but there is no need to pay too much attention to it.
There are many types of hydraulic jack hammer chisels to choose from. When applications vary, the best fit also change. Regardless the various useless types, they could be concluded into 3 ones.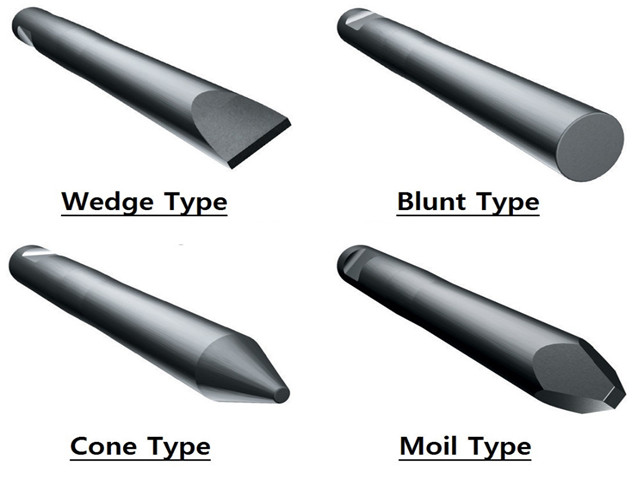
Moil Point Chisel
The moil point chisel, or known as moil type, pencil chisel, pyramid chisel, M type chisel. It is the most popular chisel type for a jack hammer. In most cases, the suppliers send this type along with hammers. It wins because of fitting the most comprehensive applications, including primary breaking, trenching, demolition, and recycling.
Material: limestone, sandstone, calcareous sediment, and other sedimentary rock, asphalt, and concrete.
Wedge type Chisel
The wedge type chisel, or wedge point, H chisel tool. A wedge point has the best penetrating power. It is mostly used for breaking reinforced concrete and rock, widely applied in foundation works, excavation works, primary quarrying, and trenching works. The wedge point is quite popular in the Middle East.
Material: reinforced concrete, some crystalline rock, limestone, and sandstone.
Blunt type Tool
The blunt type tool, or called a flat rod, is mostly used for tough conditions. The design concentrates on delivering full impact power of a jack hammer. One common usage is secondary breaking in quarrying. It is designed to conquer hard materials.
Material: Crystalline rock including magma, greenstone, and granite.
Pre-sale
- Quick Respond: all requests will be replied to within 12 hours on workdays, 7*24 hours.
- Get the Model: We will recommend the right product model and tools according to your requirement, applications, and regions.
- OEM Available: we can design and make the hammer on your logo, and your information will be kept confidential.
- Free Parts: We have a spare parts package going with each hammer, which can satisfy a 6-month replacement.
- MOQ: we accept small MOQ to start a trial.
- Fast Delivery: orders will be completed with 7-14 days. We shall update you process with pictures and videos.
- Easy for Beginners: we are friendly for beginners with little product experience and import experience. Just tell your requests and let us handle everything.
After-sale
- Technical Support: we have the most experienced R&D team with over 10 years of experience. Any issues could be solved.
- Warranty: 1 year for hammer body. All original parts are under warranty.
- Easy Claim: each major component has a unique code recorded in the ERP system. The parts under the warranty period could be posted by air or delivered by ship.
- Recommended Spare Parts: we will suggest a list of the wearing parts. No matter you are an end-user or a reseller, you have to worry about replacing parts.
- Operation Manual: we offer specified operation guidance for operators. You have no concerns about the installation, gas charging, parts replacement, and storage.
- Maintenance Tips: keeping maintaining your excavator jackhammer regularly based on our professional maintenance form. Each hammer can maximize its service life in your hand.
In the long service life of a jack hammer, regular repair and replacement of standard parts are important.
It will increase the efficiency of your hydraulic hammer. In this paragraph, you will read the most comprehensive maintenance guide online about an excavator jack hammer.
Installation of an excavator jack hammer
1) Align the center of the jack hammer bracket with the center of the forearm, gently lower the forearm, and install the pin.
2) First install the mount pin on the forearm side, then operate the bucket cylinder, and then install the pin on the connecting rod side.
3) Remove the plugs of each hose and hard pipe, and then connect them.
4) Open the stop valve of the forearm hard tube.
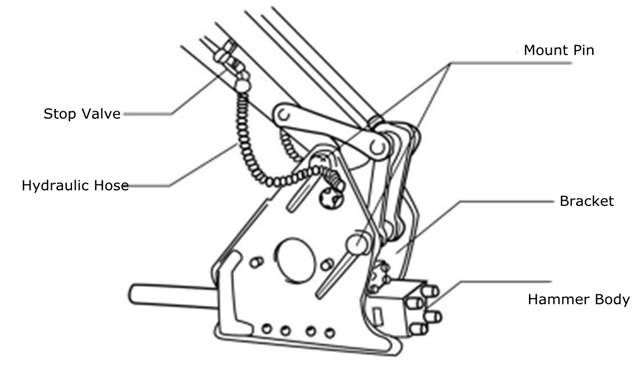
Disassembly of a hydraulic jack hammer
1) Close the stop valve on the forearm pipe.
2) Take out the hose from the forearm hard tube, and install the plug to prevent debris from falling into the hammer body and pipeline.
3) Remove the two pins on the bracket.
4) Raise the forearm slowly and remove the hydraulic breaker.
Hammer Storage
If the jack hammer is not used for a period of time, please follow the instructions below for more than one-week of storage.
1) Hoses and hard pipes must be plugged.
2) Release the nitrogen in the back head.
3) Take off the drill rod.
4) Align one end of the piston, and hit with a hammer to retract the piston to the back position.
5) Add more grease to the front head.
6) Place it indoors or on sleepers and cover it with a tarp to prevent rain.
Ps: A vertical or horizontal hydraulic Jack hammer can be stored. Holding it up would be a safer choice for longer-term storage. This allows the weight of the body to force the rod and piston up into the hammer. Then the seals do not have to bear the weight of heavy internal parts like the piston.
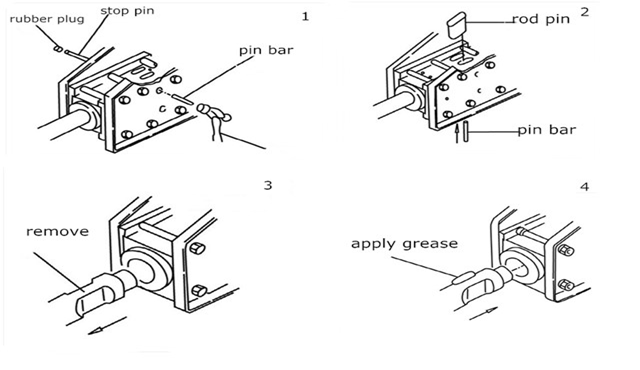
Tool Replacement
1) Set the breaker on clean and level ground, clean the hole of the Stop Pin, and remove the Stop Pin with pin bar on the opposite side of the Rubber Plug. Note: When removing Stop Pin, Rod Pin may fall down. Take care not to get injured.
2) Remove the Rod Pin with pin bar from underneath, and take the tool out of
3) Before installing the tool, apply heat-resisting grease onto the groove of the Tool. And then install the Tool in reverse order of removal.
4) Change the face of Rod Pin regularly to avoid excessive deformation. Note: Check the Rod Pin if there’s any broken or wear regularly.
The Tool should be replaced after wearing.
Rod Pin Replacement
If the drill rod pin is severely deformed, it will for hard for replacement, so please replace the rod pin every 100-500 hours of work all sides of the pin. If you use an unqualified chisel, it will cause The jackhammer cannot be used normally.
When repairing the rod pin, be sure to confirm whether the rod pin is bent Curved, and deformed.
Change the chisel after grinding the worn parts of the front cover and the drill pin.
The rod pin should be replaced immediately after severe wear. When replacing each side of the rod pin, the side Placed in the groove surface of the chisel and fixed.
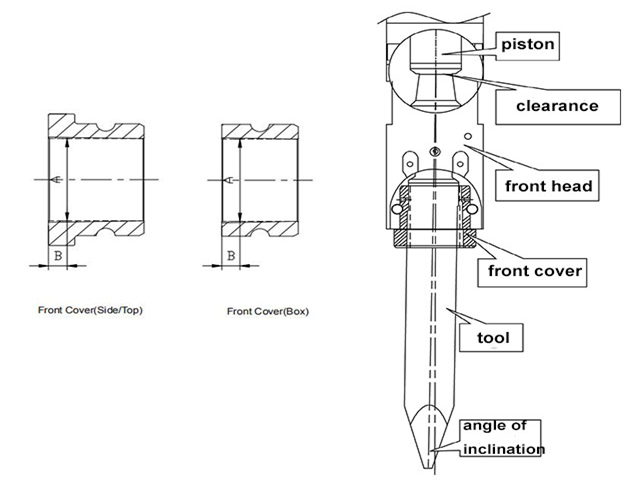
Front Cover/ T-sleeve replacement
If the front-end bushing is severely worn, it will shorten the life of the piston and tool, and severely cause it to break.
Excessive wear of the front cover will cause the following problems:
- When the rear end of the piston and the tool hit, it leads to partial hits and affects the life of the piston sharply.
- The tilt angle will be generated when the tool hits. It is easy to cause the tool to break.
Therefore, the front cover should be replaced in time when it is worn out.
Nitrogen Charging of Chamber
Please note: When you replace two or more through bolts or disassemble the breaker, you should release the nitrogen of the nitrogen chamber.
1. Adjust the pressure
1) Under the normal temperature, the pressure range of the nitrogen is showing in form.
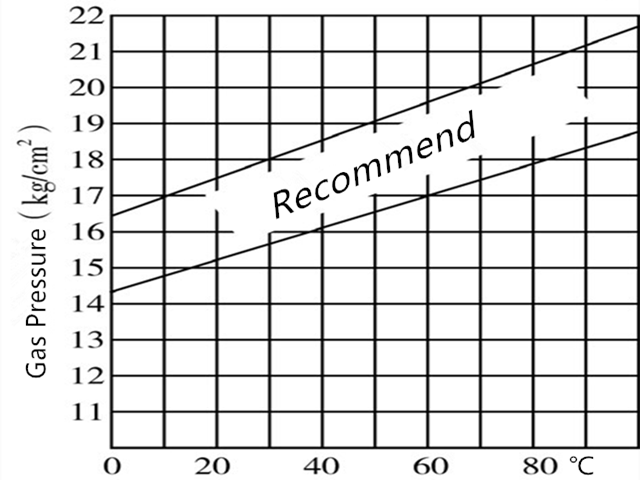
2) The proper pressure of the hydraulic jackhammer is already been adjusted when delivered from the factory, but still have to check the pressure before use.
3) The gas pressure should be checked once every two weeks.
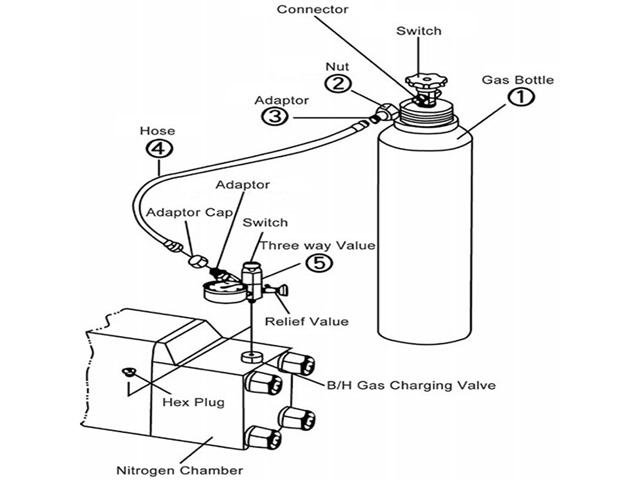
1. Check the gas pressure
1) Take off the charging valve, tighten the three-way valve clockwise and the nitrogen gauge nut, then close the relief valve.
2) Press down the switch on the three-way valve with your hand and read the nitrogen meter.
3) If the nitrogen is excessive, release the nitrogen from the overflow valve of the three-way valve to make the nitrogen be standard.
2. Charge the gas nitrogen
1) Repeat the method of checking the gas pressure 1 and 2.
2) If the nitrogen is less, connect the hose to the nitrogen meter and the adapter of the nitrogen bottle.
3) Press the switch of the three-way valve down, turn on the switch of the nitrogen bottle slowly counterclockwise, until the pressure of the nitrogen gauge to be normal.
4) Repeat charging and releasing gas three times to ensure the purity of nitrogen.
1. Warning
- Do not remove the through bolts before releasing nitrogen of the back head.
- Only use the pure nitrogen, other air could cause the hammer work
- The pressure of the gas nitrogen refers to the instruction manual.
- The gas pressure should be checked once every two weeks.
Regular Check
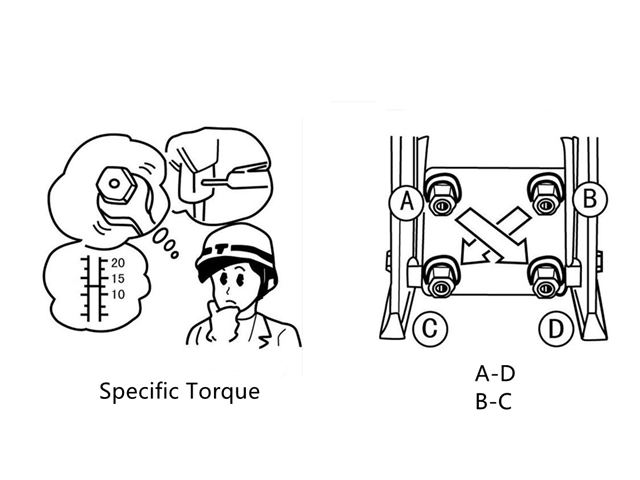
Bolts and Nuts
Before working, please check whether the nuts are loose. If the nuts are loose, it will influence the normal work of bolts. It will cause abnormal operation of the jackhammer. Besides, please tighten them according to specified torque regularly.
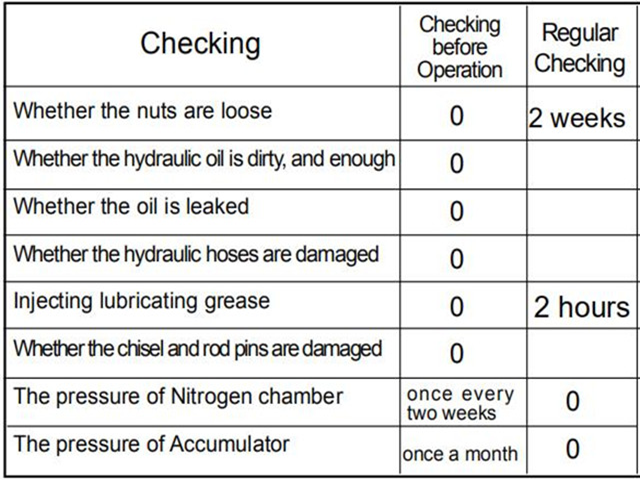
Inspection Items
Follow the chart below for regular checking items. Or take it in short.
- Grease the chisel every 2 working hours. This will protect the bush and front cover.
- Check and tighten the side bolts & nuts every two weeks. The loosed bolts will lead to bolts broken and frames cracking
- Keep hydraulic oil clean and replace seals kit every 3 months. Most cylinder and piston scratches relate to dirty oil.
Wearing Parts Check
Rod pin check
If the rod pins are damaged, the chips will be stuck in the surface of the piston or cylinder when the hydraulic jackhammer is working. Please make sure to check it before operation.
The chisel and rod pins will be deformed when the oil pressure is not enough or the working objects are fragile. During the inspection, please use a grinding wheel to polish in order to eliminate the expanding parts, or use the rod pin in return.
Tool and front cover
If the gap between chisel and the front cover is oversized, it will cause eccentric wear of piston and chisel, and lead to their unsteady contact, furtherly cause the damage of piston and chisel, and the chisel turn fragile. When the gap is oversized, the front cover must be changed.
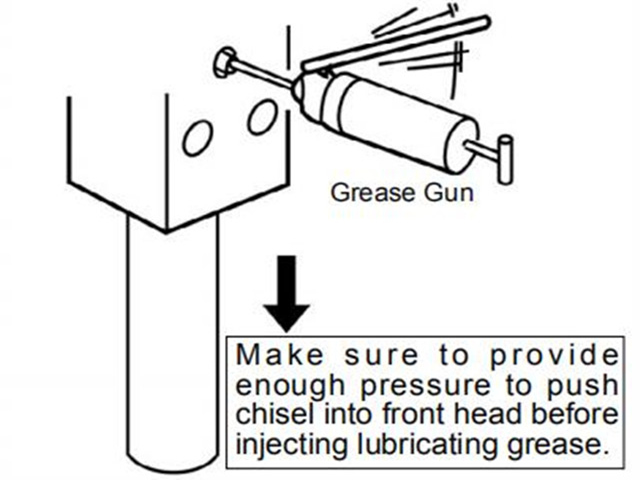
Lubricating Grease
Before working or every two hours: Push the chisel into the front head, and inject lubricating grease from the grease nipple. The referred injection is 5-20 times. The bigger model, the more injection.
Be sure to make the jackhammer standing, and push the chisel into the front head before injecting lubricating grease to prevent the grease to enter the piston impact chamber.
Hydraulic Oil Check
Check the hydraulic oil capacity in the oil tank timely, Please replenish the oil in time when it is insufficient. Please keep the hydraulic oil clean. If the hydraulic oil is polluted, it will cause issues of the control valve and do harm to the jackhammer.
Please use the same hydraulic oil produced by one company. If different oil is mixed, chemical reactions may be set off.
Oil Leakage
Check the main body, accumulator, and pipe kits of hydraulic oil to find whether there’s any leakage or not.
It is normal that oil leaks slightly at the connecting parts between the front head and the chisel. It lubricates the chisel.
If the hammer leaks oil, please replace the O-ring and oil seal on the leaking parts.
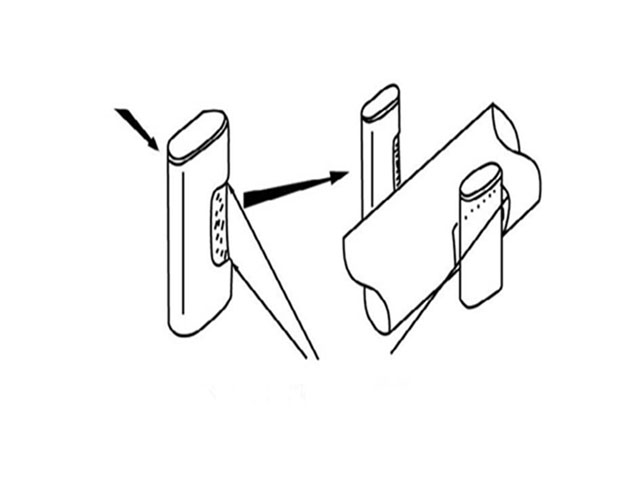
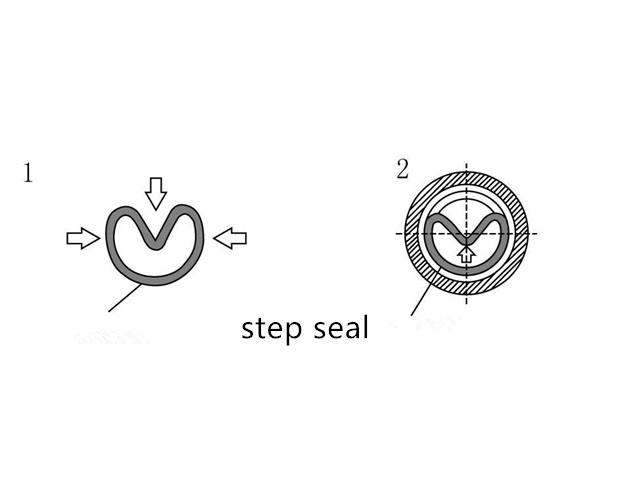
Please replace step seals by following procedures.
- Apply lubricating oil on seal retainer, oil seal, and other needed parts.
- Put O-ring in the groove inside seal retainer.
- Fold oil seal by hand (as shown in figure 1), please note not to fold too much to break the oil seal.
- Put the oil seal in the groove inside the seal retainer, push the folded part from inside to make it recover (as shown in figure 2)
Weak Blow
Cause
- The engine speed is low.
- Insufficient gas pressure in the nitrogen chamber.
- The gas pressure in the accumulator is insufficient.
- Abnormal safety setting pressure or overflow valve.
- The chisel is damaged.
Action Needed
- Adjust the speed control knob.
- Check the pressure, if the gas is released, please inject.
- Check the pressure, if the gas is released, please inject
- Confirm the set pressure. If there is an abnormality, Please adjust.
- Use a grinding wheel or a sander to trim the chisel and lining the damaged part of the front cover.
No Blow Out
Cause
- Poor adjustment of the overflow valve.
- The pressure of the nitrogen chamber is too high.
- Oil leaks in the air chamber.
- Pistons, cylinders, or valves are damaged.
- Reverse installation of high and low pressure connecting pipelines.
- The stop valve is closed or not fully opened.
- The hydraulic oil level is too low.
Action Needed
- Adjust the relief valve to normal pressure.
- Lower the air pressure to the specified pressure.
- Replace the step oil seal.
- Use sandpaper or sander to trim the contact surface.
- Exchange and connect high and low pressure pipelines.
- Open the stop valve.
- Replenish hydraulic oil.
Irregular Impact
Cause
- The pressure of the nitrogen chamber is too high.
- Oil pressure is too low.
- The chisel and the front cover are damaged.
- Pistons, cylinders, or valves are damaged.
- The pressure of the return line is too high.
- The hydraulic oil temperature is too high.
- The overflow pressure is too low.
- The hydraulic oil level is too low.
Action Needed
- Reduce the gas pressure to the specified pressure.
- Adjust the pressure of the relief valve.
- Use a grinding wheel or a sander to repair the chisel and front end Damaged bushings.
- Use sandpaper or sander to repair the contact surface.
- Check the filter element and cooler, clean or replace.
- Clean or replace the cooler or replace the high viscosity Hydraulic oil.
- Readjust the overflow pressure to the specified value.
- Check or replenish hydraulic oil.
Gas Leaking
- Gas leakage from the gas injection port.
- Leakage from the gas charging valve.
- The joint surface of the cylinder and the back head.
- Air leakage from the seal.
Cause
- Damage to the O-ring for the shaft sleeve.
- Damage to the O-ring of the valve body.
- The through-bolts are loose.
- Damage to the gas sealing ring (After the return hose is unplugged, if there are bubbles in the oil, it means that the gas seal is damaged).
Action Needed
- Replace the o-ring.
- Replace the o-ring of the valve body.
- Tighten the through bolt.
- Replace the gas sealing ring
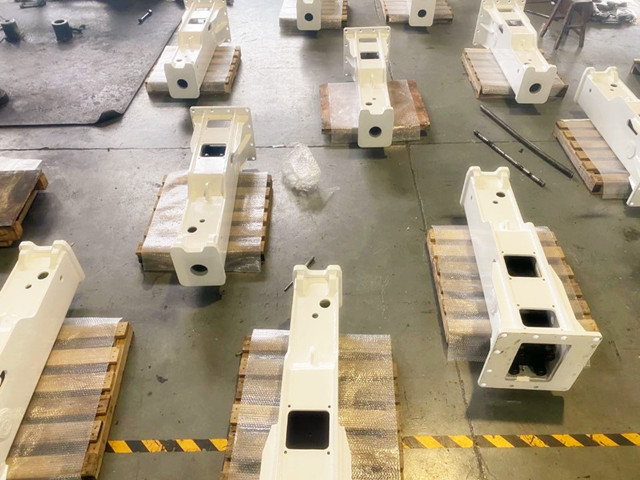
Product Gallery

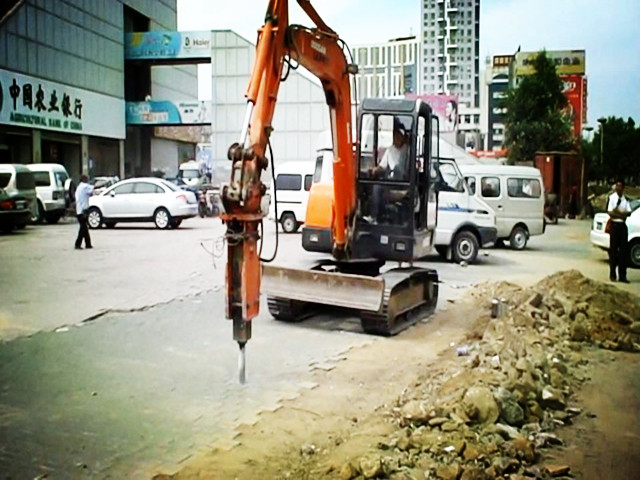
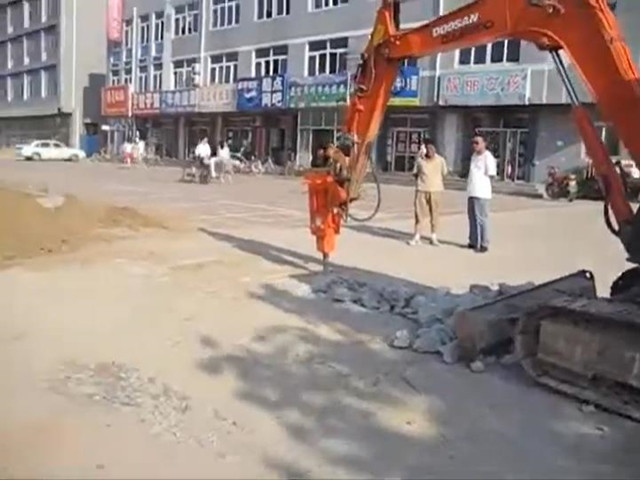
Applications